I didn't want to inundate the forums with all of my stuff, I thought I would spread them out a bit. I don't want to the "that" guy that post 17 new threads his first day in. I can dig up some pics of my workshop back when it was clean and the disgrace that it has turned into now.
It seems the busier I get with my own personal projects or commisions, the sloppier my workspace becomes.
This is what it used to look like...
And this was from a month or so ago. Unfortunately it hasn't improved at all.
Log in or register to post comments about the Virginia Tech Hokies
There really isn't a set timeline. A standard repaint will only take me about 2-3 weeks if everything cooperates. Rarely is there a case that I can just use a figure that McFarlane has put out with no modification at all, nor is it very fun to do so. If it's something that is a personal project of mine and a customer request comes in, my work gets put on the back burner until that one is finished. The timeline can go way up based on the level and difficulty of graphics that need to be created in Illustrator, tattoos, sculpting, does the customer want the piece in a custom glass base, etc.
I have two little boys and manage a medical practice so I don't get out there to "tinker" nearly as much as I'd like. I mainly stick to doing them for the athletes themselves now. For the amount of time involved in them, the compensation pretty much just covers what I have put into them. If I broke it down by the hour I would be the equivalent of a Cambodian sweatshop worker. It's a hobby and I like doing it. It's gravy when I get a request for something I was going to do anyway at some point. That is why I like doing the VT ones.
Here is an Anthony Davis one I just did for a local exhibit at the community college here in town. This was one I went all out on.
Log in or register to post comments about the Virginia Tech Hokies
Wow. Let me get this straight; you created this sculpture by hand? Amazing! What is it made of? How long does a piece like this take? Are they always about the same size, or do you deviate and go big? Curious, I've never known anyone to actually make replicas like this. I'd imagine there is a huge market for them.
Log in or register to post comments about the Virginia Tech Hokies
ok, first, phucking awesome. legs on all your comments...
Second, I assume Kyle Fuller high-fiving the ref is in the works...
Third, addressing the elephant in the room, do you sell these? And if so do you need to pay any kind of licensing back to the schools? Or have they tried to shut you down and you've gave them the virtual middle finger?
I ask because perhaps some individuals on TKP might be interested in "acquiring" one of these masterpieces
Log in or register to post comments about the Virginia Tech Hokies
I typically only do them for the athletes themselves right now (after they have graduated) in exchange for signed memorabilia. If a current player wants one I would have to deal with their family member in order to avoid any kind of NCAA grey area. These are done as 1/1 individual pieces of artwork so their really isn't a licensing requirement as long as they are not being mass-produced.
I have also received a lot of requests to do local highschool players. I did one for a friend of the family and word has spread around locally about the few that I have done with other players and parents of the players. It's pretty cool to do the young kids because their face really lights up when they see the finished product. I have found that some of these elite college athletes give less of a reaction. I don't know if its because they have had so many people telling them they are so good for so long or what.
The Process: I wrote this up for a customizing site a while ago
A custom figure typically starts with a McFarlane figure in a pose with a body type that matches the player. The sculpting that I do is added to the existing figure, I do not sculpt these poses from scratch. The figure gets broken down and is swapped with parts of other figures to get that players equipment just right (ie - taped shoes, visor, QB wristband, gloves, etc.). The Tyrod that I am working on right now started in an NFL Series 23 Drew Brees pose. Brees and Tyrod have similar height, weight, and body type. I clean the figure if it has been sitting for a while or is not fresh out of the package, boiling/heating the figure and taking it apart, trying not to break/tear any of the pieces in the process.
-Figure prep - Wood screws are put into neck sockets and any other parts if nec. to hang the figure after prime/paint, sanding any lines from McFarlane's molds that are evident on parts, sanding down chinstrap residue on helmet after disassembly, clean/wipedown figure after sanding, trimming/sculpting any pieces in need of further customization from factory default
-Figure priming - Prime the figure 1-2 times and allow time between each application to completely dry. Now that the figure is a uniform color you have to go back and look for any spots in need of further sanding/attention.
-Graphics creation - Time spent using program of choice creating the graphics for the decal that will be applied to the figure. In my opinion this is THE most important part of the process. The best paint application possible cannot make up for poor graphics/decal quality. The devil is in the details here, more time spent getting the little details right here will make or break the figure in the latter stages of completion.
-Decal creation - You now have to print, dry, and add a couple (2-3) coats of sealer on your decals, allowing time between each application to completely dry. To get the best decals when they are being created you have to take or have pictures of your base figure with a ruler or similar measuring device in the picture for scale, size the photo/decals in your decal creation medium of choice to be sure that your decals will fit the figure/parts you are going to be using.
-Paint matching - Now that you have your decals that you are happy with comes the task of matching paint to the decals to be used. There are some paints out there that are close to what you have created, but most of the time you have to mix paint to get an exact match or at least close enough to what you are comfortable with. This takes time and going back and forth with different shades to get exactly what you are looking for.
-Initial Paint application - Pretty basic here. You just want to lay down your base coat of paint for each part you are doing. Several coats and drying time are typically required before applying decals. This step can be swapped with initial decal application if so chosen. I prefer to put my decals on after I have put a couple coats of paint on and can no longer see any primer/light spots in the first few layers of paint.
-Decal Application - Decals are the best worst part of customizing. This is where your project goes from painted plastic to actually starting to look like what you have envisioned all along. Here you are using an exacto knife to cut out your decals, applying microsol (and for some microset ). to apply the decal to the figure. Now you begin the process of rotating a Q-tip/makeup sponge, brush with microsol, and blowdryer until you get a nice flat decal applied to the surface, this takes time and multiple rounds of using these items until you have worked out all of the wrinkles in the decal. ***Some will now add the first clear coat to the figure. If any decals have been made too small/too big now that you have them on the figure, you need to go back to graphics creation, shrink them down, reprint, and reseal.
-Decal blending - Another drawn out process. Now you are coming back with your base coat color for each piece and reapplying the color over top of the decal to cover up any part of the decal that bled/faded during the application process. This will take several coats and drying time as well and needs to be repeated until you have blurred the line from where the original figure starts and where the decal begins (much easier said than done). This is where you find out just how good you did in your Paint matching step. If you do not have a good match you have to go back and tweak your colors in between coats. Continue adding coat of paint to the figure and/or decals until you get a nice, uniform paint scheme that you are happy with. For certain colors, (yellow, red, orange, white, etc.) this will take MANY coats. Drying time must be allowed in between coats to get a nice smooth finish.
-Sealing - Assuming that you are now happy with the decal application and the way that everything looks it's time to seal your figure. We are going to add 2-3 thin coats of clear coat to the figure. This process will give the figure/parts a very shiny appearance but will keep the figure looking its best for as long as possible. Allow ample time in between coats for everything to completely dry before adding the next coat.
-Dullcoat/Glosscoat - Shiny parts will require gloss coat (helmets, facemasks, palms of gloves, etc.). Parts that you do not want to have the sheen from the clear coat will now have to be sprayed with Dullcoat. This process gets your figure back to the matte finish it had when you were applying the paint, but was not sealed. Multiple layers required for each, drying time factored in before adding additional coats.
-Final assembly - All the parts look exactly how you wanted them to or exactly the best to which you are happy with. A very talented customizer said it best with "every custom gets to a point where you just have to let things go." You can go back and forth a hundred times to get a sock or armband line just right, but at some point you just have to stop and say that it's done. Grab your superglue and start putting the parts together. Hopefully you have trimmed the joints in the figure teardown step so that these slide right into place, if not...do that now. Once the glue is applied you need to move quickly to get the part exactly where/how you want it before the super glue sets. If you do not get it in place in time you are now looking at having to break it off, which usually results in paint damage and now you are traveling back several steps to perform repairs.
Assuming all of the steps have gone flawlessly, you now have your finished product. None of these steps include time spent (and yes, all of these have happened to me at some point) gluing a part to your finger, nicking yourself with an xacto blade, dropping a part on the ground resulting in paint damage, etc.
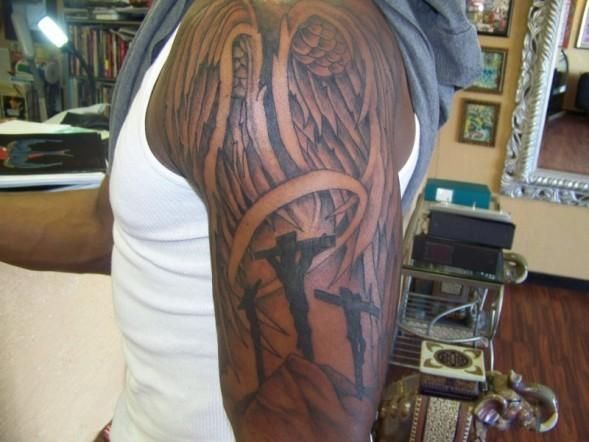
None of these steps also include such things as custom poses, tattoos, sculpting, figure modification, etc.
In-progress pics of various projects:
Graphic Design
Custom Poses
Parts
Decals
Decal application
Clear Coat
Glosscoat
Reassembly
Finished Product
Custom Glass Base
Tattoos
Scale
Sculpting
Log in or register to post comments about the Virginia Tech Hokies
Find me some high-res pics of it and I'll pin something together and see if you guys approve. I have an idea of a pose that will work for it, will only need minor sculpting/part swapping.
I was already toying with the idea of a Fuller 3-pack with custom base. I already have Kendall's graphics done.
Log in or register to post comments about the Virginia Tech Hokies
Seriously, you are amazing. Would you mind if I referred you over to Paul Lukas from UniWatch? Outside of the stuff he does for ESPN.com's Page 2, he runs his own blog with a pretty decent following, and I know for a fact he would LOVE to speak with you and do a feature article on you and your craft.
By the way, with your Bryan Randall figure below, it just doesn't look right. Assuming you're still waiting to put on the piping from the 2004 jerseys, those numbers are wrong. There was no maroon gap between the white and the orange in that set. Only pointing this out because I know you are going for absolute accuracy here
Compare:
Log in or register to post comments about the Virginia Tech Hokies
I actually tabled this custom. The piping is incredibly difficult to do by hand and the best option is to make the decals for it. This project was started when I first got going and all of that was above my pay grade. Orange paint (along with red and yellow) does not cooperate very well at at with those pigments. The right way to have done it would have been to; A. draw/bend all of the piping beforehand in Illustrator and do them as decals, B. airbrush the figure white after priming (to make the orange show better) and paint all of the piping first, THEN go back and add the maroon and clean up any shaky spots. As is - that torso would not have worked and thus needs to be restarted from scratch. It's one of things you learn by just diving in an doing them, trial and error. Those early '00's jersey are a pain!
Good eye on the gap...I can honestly say I never noticed that.
Log in or register to post comments about the Virginia Tech Hokies
Damn, I have to admit, the detailing is pretty darn impressive.
Got a question - do you mind if I contact you directly? I have an idea for something I would rather not share on here, but it could be something you'd be interested in, if you don't mind.
Log in or register to post comments about the Virginia Tech Hokies
Yea, I have a few of these "original" figures (hockey, football, and baseball), there are no "Real" Tech figures that I know of... I would definitely want to purchase one if you sell these/do custom orders...
Log in or register to post comments about the Virginia Tech Hokies


Comments
Pretty sweet. Would be interesting to see a photo thread of how you create your figures, the tools etc that you use in the process.
I didn't want to inundate the forums with all of my stuff, I thought I would spread them out a bit. I don't want to the "that" guy that post 17 new threads his first day in. I can dig up some pics of my workshop back when it was clean and the disgrace that it has turned into now.
It seems the busier I get with my own personal projects or commisions, the sloppier my workspace becomes.
This is what it used to look like...

And this was from a month or so ago. Unfortunately it hasn't improved at all.

How long does each one take?
There really isn't a set timeline. A standard repaint will only take me about 2-3 weeks if everything cooperates. Rarely is there a case that I can just use a figure that McFarlane has put out with no modification at all, nor is it very fun to do so. If it's something that is a personal project of mine and a customer request comes in, my work gets put on the back burner until that one is finished. The timeline can go way up based on the level and difficulty of graphics that need to be created in Illustrator, tattoos, sculpting, does the customer want the piece in a custom glass base, etc.
I have two little boys and manage a medical practice so I don't get out there to "tinker" nearly as much as I'd like. I mainly stick to doing them for the athletes themselves now. For the amount of time involved in them, the compensation pretty much just covers what I have put into them. If I broke it down by the hour I would be the equivalent of a Cambodian sweatshop worker. It's a hobby and I like doing it. It's gravy when I get a request for something I was going to do anyway at some point. That is why I like doing the VT ones.
Here is an Anthony Davis one I just did for a local exhibit at the community college here in town. This was one I went all out on.
Dang you have the unibrow and everything
#BrowDown
he's about to take that shit from roscoe.
Wow. Let me get this straight; you created this sculpture by hand? Amazing! What is it made of? How long does a piece like this take? Are they always about the same size, or do you deviate and go big? Curious, I've never known anyone to actually make replicas like this. I'd imagine there is a huge market for them.
ok, first, phucking awesome. legs on all your comments...
Second, I assume Kyle Fuller high-fiving the ref is in the works...
Third, addressing the elephant in the room, do you sell these? And if so do you need to pay any kind of licensing back to the schools? Or have they tried to shut you down and you've gave them the virtual middle finger?
I ask because perhaps some individuals on TKP might be interested in "acquiring" one of these masterpieces
I typically only do them for the athletes themselves right now (after they have graduated) in exchange for signed memorabilia. If a current player wants one I would have to deal with their family member in order to avoid any kind of NCAA grey area. These are done as 1/1 individual pieces of artwork so their really isn't a licensing requirement as long as they are not being mass-produced.
I have also received a lot of requests to do local highschool players. I did one for a friend of the family and word has spread around locally about the few that I have done with other players and parents of the players. It's pretty cool to do the young kids because their face really lights up when they see the finished product. I have found that some of these elite college athletes give less of a reaction. I don't know if its because they have had so many people telling them they are so good for so long or what.
The Process: I wrote this up for a customizing site a while ago
A custom figure typically starts with a McFarlane figure in a pose with a body type that matches the player. The sculpting that I do is added to the existing figure, I do not sculpt these poses from scratch. The figure gets broken down and is swapped with parts of other figures to get that players equipment just right (ie - taped shoes, visor, QB wristband, gloves, etc.). The Tyrod that I am working on right now started in an NFL Series 23 Drew Brees pose. Brees and Tyrod have similar height, weight, and body type. I clean the figure if it has been sitting for a while or is not fresh out of the package, boiling/heating the figure and taking it apart, trying not to break/tear any of the pieces in the process.
-Figure prep - Wood screws are put into neck sockets and any other parts if nec. to hang the figure after prime/paint, sanding any lines from McFarlane's molds that are evident on parts, sanding down chinstrap residue on helmet after disassembly, clean/wipedown figure after sanding, trimming/sculpting any pieces in need of further customization from factory default
-Figure priming - Prime the figure 1-2 times and allow time between each application to completely dry. Now that the figure is a uniform color you have to go back and look for any spots in need of further sanding/attention.
-Graphics creation - Time spent using program of choice creating the graphics for the decal that will be applied to the figure. In my opinion this is THE most important part of the process. The best paint application possible cannot make up for poor graphics/decal quality. The devil is in the details here, more time spent getting the little details right here will make or break the figure in the latter stages of completion.
-Decal creation - You now have to print, dry, and add a couple (2-3) coats of sealer on your decals, allowing time between each application to completely dry. To get the best decals when they are being created you have to take or have pictures of your base figure with a ruler or similar measuring device in the picture for scale, size the photo/decals in your decal creation medium of choice to be sure that your decals will fit the figure/parts you are going to be using.
-Paint matching - Now that you have your decals that you are happy with comes the task of matching paint to the decals to be used. There are some paints out there that are close to what you have created, but most of the time you have to mix paint to get an exact match or at least close enough to what you are comfortable with. This takes time and going back and forth with different shades to get exactly what you are looking for.
-Initial Paint application - Pretty basic here. You just want to lay down your base coat of paint for each part you are doing. Several coats and drying time are typically required before applying decals. This step can be swapped with initial decal application if so chosen. I prefer to put my decals on after I have put a couple coats of paint on and can no longer see any primer/light spots in the first few layers of paint.
-Decal Application - Decals are the best worst part of customizing. This is where your project goes from painted plastic to actually starting to look like what you have envisioned all along. Here you are using an exacto knife to cut out your decals, applying microsol (and for some microset ). to apply the decal to the figure. Now you begin the process of rotating a Q-tip/makeup sponge, brush with microsol, and blowdryer until you get a nice flat decal applied to the surface, this takes time and multiple rounds of using these items until you have worked out all of the wrinkles in the decal. ***Some will now add the first clear coat to the figure. If any decals have been made too small/too big now that you have them on the figure, you need to go back to graphics creation, shrink them down, reprint, and reseal.
-Decal blending - Another drawn out process. Now you are coming back with your base coat color for each piece and reapplying the color over top of the decal to cover up any part of the decal that bled/faded during the application process. This will take several coats and drying time as well and needs to be repeated until you have blurred the line from where the original figure starts and where the decal begins (much easier said than done). This is where you find out just how good you did in your Paint matching step. If you do not have a good match you have to go back and tweak your colors in between coats. Continue adding coat of paint to the figure and/or decals until you get a nice, uniform paint scheme that you are happy with. For certain colors, (yellow, red, orange, white, etc.) this will take MANY coats. Drying time must be allowed in between coats to get a nice smooth finish.
-Sealing - Assuming that you are now happy with the decal application and the way that everything looks it's time to seal your figure. We are going to add 2-3 thin coats of clear coat to the figure. This process will give the figure/parts a very shiny appearance but will keep the figure looking its best for as long as possible. Allow ample time in between coats for everything to completely dry before adding the next coat.
-Dullcoat/Glosscoat - Shiny parts will require gloss coat (helmets, facemasks, palms of gloves, etc.). Parts that you do not want to have the sheen from the clear coat will now have to be sprayed with Dullcoat. This process gets your figure back to the matte finish it had when you were applying the paint, but was not sealed. Multiple layers required for each, drying time factored in before adding additional coats.
-Final assembly - All the parts look exactly how you wanted them to or exactly the best to which you are happy with. A very talented customizer said it best with "every custom gets to a point where you just have to let things go." You can go back and forth a hundred times to get a sock or armband line just right, but at some point you just have to stop and say that it's done. Grab your superglue and start putting the parts together. Hopefully you have trimmed the joints in the figure teardown step so that these slide right into place, if not...do that now. Once the glue is applied you need to move quickly to get the part exactly where/how you want it before the super glue sets. If you do not get it in place in time you are now looking at having to break it off, which usually results in paint damage and now you are traveling back several steps to perform repairs.
Assuming all of the steps have gone flawlessly, you now have your finished product. None of these steps include time spent (and yes, all of these have happened to me at some point) gluing a part to your finger, nicking yourself with an xacto blade, dropping a part on the ground resulting in paint damage, etc.
None of these steps also include such things as custom poses, tattoos, sculpting, figure modification, etc.
In-progress pics of various projects:
Graphic Design

Custom Poses

Parts

Decals

Decal application

Clear Coat

Glosscoat

Reassembly

Finished Product

Custom Glass Base

Tattoos
Scale

Sculpting

DAMN! those are sweet!!!! awesome work. great talent.
Holy hell that's a lot of detail. Nice stuff.
Gotta second fernleyhokie's assertion that kyle high fiving the ref has to be next.
Find me some high-res pics of it and I'll pin something together and see if you guys approve. I have an idea of a pose that will work for it, will only need minor sculpting/part swapping.
I was already toying with the idea of a Fuller 3-pack with custom base. I already have Kendall's graphics done.
Seriously, you are amazing. Would you mind if I referred you over to Paul Lukas from UniWatch? Outside of the stuff he does for ESPN.com's Page 2, he runs his own blog with a pretty decent following, and I know for a fact he would LOVE to speak with you and do a feature article on you and your craft.
By the way, with your Bryan Randall figure below, it just doesn't look right. Assuming you're still waiting to put on the piping from the 2004 jerseys, those numbers are wrong. There was no maroon gap between the white and the orange in that set. Only pointing this out because I know you are going for absolute accuracy here
Compare:


I actually tabled this custom. The piping is incredibly difficult to do by hand and the best option is to make the decals for it. This project was started when I first got going and all of that was above my pay grade. Orange paint (along with red and yellow) does not cooperate very well at at with those pigments. The right way to have done it would have been to; A. draw/bend all of the piping beforehand in Illustrator and do them as decals, B. airbrush the figure white after priming (to make the orange show better) and paint all of the piping first, THEN go back and add the maroon and clean up any shaky spots. As is - that torso would not have worked and thus needs to be restarted from scratch. It's one of things you learn by just diving in an doing them, trial and error. Those early '00's jersey are a pain!
Good eye on the gap...I can honestly say I never noticed that.
Damn, I have to admit, the detailing is pretty darn impressive.
Got a question - do you mind if I contact you directly? I have an idea for something I would rather not share on here, but it could be something you'd be interested in, if you don't mind.
I'm new here so I'm not sure if there are private messaging features built into the site. If not, DM me on Twitter.
I just followed you, if you don't mind returning the favor, and then I'll be able to DM you through the mobile app.
Thanks!
I have to say his head just doesn't look right either in this pic...
Your work is amazing. The level of detail is fantastic. I look forward to seeing more in the future; thanks for sharing your art!
How would one go about purchasing/requesting one?? I would definitely be interested! Awesome stuff!
Yea, I have a few of these "original" figures (hockey, football, and baseball), there are no "Real" Tech figures that I know of... I would definitely want to purchase one if you sell these/do custom orders...
WOW, Im v ery impressed. I would Love to own a VT figureine. This is such a cool thread, Thanks for Posting your photos.
Mike Vick in the classic uni.
Kam Chancellor.
Wow! This is fantastic work sir! Very detailed. Love them! :)
I assume this is also in the works...
I WOULD PAY MONEY FOR AN A.J. HUGHES FIGURE
I like the pic with all the body parts...you are kind of like the Jeffrey Dahmer of action figures...
I guess this qualifies as a complement?
Of course!
His figures are amazing.
Wouldn't being compared to a serial killer make you feel good about yourself?
I was reminded of the Ice Truck Killer from season one of Dexter.
Ok, um First: I want one. Second: how much? And Third: I need to change my pants.